Certbot is normally supposed to run on your deployed production web server, where it would automatically get the certificates for that domain and install them as well. But what if you don’t like the idea of doing it in place on your production boxes? What if you want to control each step along the way to generate the free Letsencrypt certificates and move them into production using your own process?
We will show you how you can still use Certbot manual key generation to get free Letsencrypt certificates anywhere, including your laptop and then move them into production yourself or through your normal release process. Once you understand the steps, you can automate them yourself using your own tools that are compatible with whatever unique system you have.
How do I set it up?
This used to be complicated before Certbot. SSL normally required purchasing certificates, and doing so periodically because SSL certificates expire. Then these certificates had to be manually installed on your web site.
Now there’s a better way, thanks to the Electronic Fronteer Foundation. The EFF created a system called Letsencrypt, where you can acquire a certificate free of charge and get it renewed periodically using a tool called Certbot. This article explores its so called manual mode.
Manual key generation with Letsencrypt certbot
When you first create your certificate for your website, even if you are using Certbot, you might want to control the process by doing it manually. This way you can also generate them on some other box, and then install them manually. Although, you will need to have access to your prod boxes to make this work, because you will have to install the Letsencrypt web challenge on your prod boxes by hand, for Certbot to be able to verify that you control the DNS domain.
No need to install Certbot when using the Docker image
To make the process even easier, Certbot comes with an official Docker image, certbot/certbot. We will use it to show how Certbot can generate certificates for any remote box that needs it, from anywhere, as long as we have Docker installed.
Note: If you would like to use the automatic version of certbot, please read my other post about automatic certificate generation.
The Steps
1. Install Docker if you don’t have it
In the unlikely case that you don’t have Docker installed, install it now from Docker.
2. Generate a web challange
Issue the following command to request letsencrypt.org to generate a web challenge. Make sure you change example.com to your domain name.
docker run -it --rm --name certbot \
    --volume "/tmp/etc-letsencrypt:/etc/letsencrypt" \
    --volume "/tmp/var-lib-letsencrypt:/var/lib/letsencrypt" \
    certbot/certbot certonly \
    --manual --manual-public-ip-logging-ok \
    --email admin@example.com --agree-tos \
    --domain example.com --rsa-key-size 2048
This will generate a Letsencrypt web challenge, and display it on the terminal as follows:

3. Install the challenge on your web server
Don’t press Enter just yet! This message is instructing you to place well known content at a well known URL on your production web server. letsencrypt.org will come in with an HTTP get request at the URL displayed above, and will expect to find that content. If it can find it, you will have proven to letsencrypt.org that you control the domain, since you could install this content on it, and they will issue a certificate. Therefore we must install the content at the web address displayed above before we hit Enter.
Simply create a file on your webserver or other web application’s file system with the content displayed to you at the URL http://example.com/.well-known/acme-challenge/<key displayed to you>.


4. Generate your fullchain.pem and privkey.pem
Once done with copying the web challenge onto your server, you can hit Enter and you will receive the certificate .pem key files in /tmp/etc-letsencrypt/live. (If you are on Windows, there is no /tmp directory normally, so you need to give some other directory in the command above that does exist, or just create a /tmp directory yourself manually!)
You will get 4 key files in /tmp/etc-letsencrypt/live/example.com from certbot: cert.pem, chain.pem, fullchain.pem, and privkey.pem.
fullchain.pem is cert.pem and chain.pem added up. You will almost always want to use fullchain.pem, because the certificate is only valid when the full chain of trust can be verified at the same time. This is also the only way we can import them into a Java key store without error messages. So ignore the first two files.
If you are actually doing this on your production server, you can point the target directories directly to that server’s /etc, by –volume “/etc/letsencrypt:/etc/letsencrypt”. You will need the right permissions. If you are doing this from somewhere else, e. g. your laptop, or if you don’t want to give letsencrypt write access to /etc (!) then leave it as /tmp/etc-letsencrypt.
5. Create your full certificate
Your full certificate is nothing more than your full certificate chain and your private key .pem files added up.
Note: For most well known web servers e. g. Apache, you can skip this step and also the next one, because they can usually import fullchain.pem and privkey.pem directly.
cat fullchain.pem privkey.pem > /tmp/fullcert.pem
6. Install the certificate in your web application
This last step depends on what application you’re using to serve web content. In my case, I use a Scala Akka HTTP application, not a web server, which expects a Java key store. Java keystores can directly load PKCS12 files. Our concatenated key file fullcert.pem can be easily converted to a pkcs12 file using open ssl. The resulting file can be directly imported into a Java keystore.
openssl pkcs12 -export -out /tmp/fullchain.p12 -in /tmp/fullcert.pem
Move /tmp/fullchain.p12 to someplace your app can find it. Then in your Scala app:
val myKeystore = getClass.getClassLoader.getResourceAsStream("fullchain.p12")
...
See the full example code:
A Java app would be very similar, because you would also have to use a Java keystore. But the APIs would be a little different. Fundamentally though, this same process would be usable to manually generate Letsencrypt certificates for any JVM hosted web app.
Is this how Letsencrypt is supposed to be used?
The steps above are a useful way to get your initial certs fast. It also shows you how the web challenge works, because it makes you take each step by hand which makes you understand those tasks well. But Letsencrypt can do a very important next step. If you are willing to install Certbot on your production site and if you are using a web application that Certbot directly supports, and if you are on an operating system Certbot supports, it will automatically renew and install certificates for you regularly. But that is a lot of ifs. If some of that doesn’t apply to your situation, you can still use the manual process described above to get certificates fast and free!
Wildcard certificates
If you have many subdomains, generating and installing a different certificate for each subdomain is a tedious process. Using wildcard certificates simplifies the management of SSL certificates by offering you a way to generate just one certificate for all your subdomains. If you want to generate wildcard certificates with Certbot, you must use manual mode, because you need to use the so called DNS challenge, different from the previously discussed web challenge, which requires the use of manual mode.
Does a wildcard certificate work for the root domain?
Yes, it does! If you need certificates such as example.com, server1.example.com, and server2.example.com, then you want to include the root domain. The command below will show you how to do this. If you don’t want to include the root domain, simply leave it out of the command below.
The DNS challenge
When running Certbot manual mode with the DNS challenge, you run Certbot on some machine other than your target machine that needs the certificates, just like you do with the web challenge but it will ask you to install a TXT DNS record into your hosting provider’s DNS, as opposed to installing a text file into your target machine’s web server. So here’s how it works. Issue the following command:
docker run -it --rm --name certbot \
    --volume "/tmp/etc-letsencrypt:/etc/letsencrypt" \
    --volume "/tmp/var-lib-letsencrypt:/var/lib/letsencrypt" \
    certbot/certbot certonly \
    --manual --manual-public-ip-logging-ok \
    --preferred-challenges dns \
    --server https://acme-v02.api.letsencrypt.org/directory \
    --domain '*.example.com' --domain 'example.com' \
    --email admin@example.com \
    --agree-tos \
    --rsa-key-size 2048
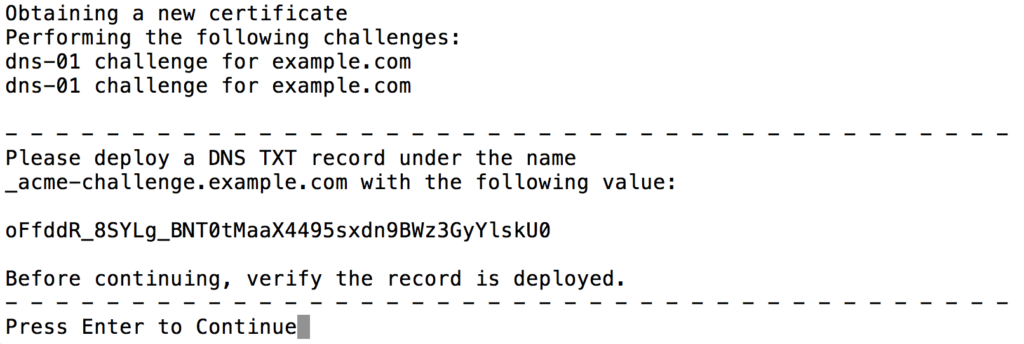
Wait for your DNS TXT record to come up live
Depending on your DNS hosting provider and on what options you picked when you installed the TXT record, you will have to wait until it propagates through the DNS network and becomes available on the internet. You could just keep hitting enter and retrying until it finally succeeded, or you could just wait a very long time before you proceed, but there is a better way: Run a DNS query for the TXT record. This is how you would do this from the command line:
$ nslookup -q=txt _acme-challenge.example.com 8.8.8.8
Server:		8.8.8.8
Address:	8.8.8.8#53

Non-authoritative answer:
_acme-challenge.example.com	text = "oFfddR...kU0"
8.8.8.8 is the google DNS server that we are asking to get us the record. Then we have to prepend _acme-challange as a subdomain in front of our domain because that is how you installed the TXT record. The result will print out the TXT record once it comes up live. When you see your TXT record here, you can hit enter to let Letsencrypt Certbot find it and issue you a certificate.
Another option is to use a free web-based DNS lookup tool such as https://toolbox.googleapps.com/apps/dig/#TXT/ and entering _acme-challenge.example.com. This will print out the same information.
Differences to the web challenge
There are a couple of things to notice here: First, we had to list the subdomain wildcard and the root domain separately. Only adding the wildcard *.example.com did not include the root domain in the certificate for me. So make sure you list them both, if your intention is to cover your root domain and all your subdomains. Second, we specifically told Certbot that our preferred challenge is DNS. If you don’t do this it will try to use the web challenge for the root domain, which would make the process unnecessarily complicated. This way we can stick to the DNS challenge all the way through. Third, we added –server https://acme-v02.api.letsencrypt.org/directory, which is required for wildcard certificates.
When you must use wild card certificates
There are some situations where wildcard certificates are the only viable option. If you expect to be able to swap hosts, such as when you have a production.example.com and a staging.example.com, for testing and you want to swap them to move a new version of an app from staging to production, you must use wild card certificates, because otherwise the certificates won’t work under their new host names, once the hosts are swapped.
Testing: “too many attempts” error
When you generate certificates this way manually, inevitable you will experiment and may end up generating too many certificates. In this case you will have to wait until you can generate any more for the same domain. There’s an in-depth discussion of this topic here at https://letsencrypt.org/docs/rate-limits/. When you run into a limit, you will get an error message like this:

The best way to prevent this is to use dry runs by appending –dry-run to the Certbot command line. This will go through the motions of getting certificates to test your set up, but will not get a certificate in the end. It will simply tell you if your test was successful. Here’s an output from a dry run:

When to use Certbot manual mode?
There are some circumstances where manual mode is clearly the way to go. Here are few examples:
You have a formal build process
Most professional shops will have strict controls over what can be installed on their production servers. If you run a large operation with formal procedures as to how something can be installed into your production environment, you might have to do certificate generation step by step manually, so that you can adapt the steps to your requirements, as necessary.
For example, financial institutions and other entities handling sensitive information will not allow the installation of any software into their production environment, until it is thoroughly checked for security holes. In these cases, installing Certbot on production boxes is likely to be out of the question.
You are doing this the first time
If you are just experimenting, it is really helpful to understand every step along the way. For instance, if you want to learn how certificates work, going this way will assure that you have a clear grasp of what components SSL certificates have and how they have to be installed into your web application
You have a custom web application
Often we need certificates for data processing applications that are not web servers. For instance the example I was using in this article was a custom web application written in Scala using Akka HTTP, which acts as a built in web server. Many other libraries can create custom web servers. Or when two systems need to talk to each other securely, SSL is frequently chosen to provide that security. Each of these situations is completely unique and manual configuration is often what makes the most amount sense.
When you need a wildcard certificate
Wildcard certificates require the use of manual mode, as discussed above.
Why you need SSL
If you are wondering why it is important to enable HTTPS on your sites, please read our article on what can happen to you if you don’t use HTTPS. The consequences can range from intercepted communications, identity theft, and stolen passwords, to lowered SEO rankings. No professionally designed web application or site facing the open Internet should be without SSL enabled.
Do I need to install Certbot to generate Letsencrypt certificates?
No you don’t! You can use Docker to generate certificates without ever installing any specific tool.
What is the main advantage of using Certbot Manual Mode?
You don’t need to be on the box to generate them. You can create them anywhere, and copy them over by hand.
Are Letsencrypt certificates considered safe?
Yes, sites using Letsencrypt free certificates are considered secure and will show the lock in the URL just like paid certificates do.
Does Letsencrypt Certbot support wildcard certificates?
Yes, using the Letsencrypt DNS challenge, Certbot can generate wildcard certificates.
Hi, I created the .well-known/ folder, but it is not accessible from internet. If I place the acme-challenge file anywhere else, it is accessible. Why is there dot at the beginning of folder and how to make it accessible for the challenge?
The file itself will not be accessible directly. You need to expose it through your web server. Think about it this way: The certbot server needs to be able to come in to confirm that you have access to the web server. The way you do that is that you create an HTTP endpoint (a web address) where they can find the piece of data they gave you. So when you create that well known path in your fine system, you are only half way done. You will have to tell your web server to serve it up at that address. The file could actually reside anywhere in your file system. That is not important. The web address is and it has to match what they gave you! The dot is a UNIX convention which means “hide this file” from file listing tools, essentially saying its a system file.
Great tutorial!! thank you so much. Quick question, how to renew ssl using docker? when I typed /usr/local/bin/certbot-auto renew, my Mac terminal shows:
WARNING: certbot-auto support for this macOS is DEPRECATED!
Please visit certbot.eff.org to learn how to download a version of
Certbot that is packaged for your system. While an existing version
of certbot-auto may work currently, we have stopped supporting updating
system packages for your system. Please switch to a packaged version
as soon as possible.
I went to that site but I do not understand. I am new in ssl. In addition to that I tried to use docker on catalina and it is not working your tutorial there. (it said that docker can not access some folders).
Two things to keep in mind: 1) When you run Docker and you need to access the local file system, you need to map those files in the docker command. 2) When people map the local file system paths they often give references wrong because they are on windows and the paths may be different and may look different. My tutorial assumes the UNIX/LINUX naming conventions such as /tmp for temp directory.
Also, the best way to get around the certbot-auto version issue is to use the latest docker image. Don’t install Certbot! Then you will automatically get the latest version.
Hi, If I run your code, everything runs fine, when I change the domain and email I get error message: docker: invalid reference format. It doesn’t make any sense? I have checked and done it several time to eliminate any typos, not no luck so far.. Any help is appreciated.
Pedja, this often happens when people map the volumes for docker wrong. For example you are on windows and tried to map the path as UNIX /tmp and docker cannot make sense of the path. If you are still have an issue, please post your docker command here with the exact error (just remove any sensitive info from it like host and IP), and I’d be happy to take a look.
Hey kornel, how are you doing?
This is a very complete tutorial.
But I have a doubt related to wildcards need to be bind to a webserver (apache/nginx). In my case, I’m building some API prior to the website and I need to secure and certificate my database server (it is a vendor requirement) and API servers, all of them in AWS, so I thought wildcards would do that. And as soon as my website is ready, the certificate can be attached to it too.
Anyway, how should I proceed in my case? Should I follow the tutorial as is or perform some adjustments?
Thanks in advance,
Renato
Renato, wild cards will help you when the host name changes because they are not attached to an exact domain name. I used them in a scenario when I had a staging.example.com and prod.example.com. So I could secure the staging server with a wildcard cert, and when done with development, rename the DNS to prod and it would still work, because it is the same certificate for both.